
Bạn muốn tạo một trang web local WordPress bằng XAMPP mà không biết cách?
Trong bài viết này, chúng tôi sẽ hướng dẫn cho bạn cách tạo một trang web local WordPress bằng XAMPP.
Hãy cùng tìm hiểu nhé.
Lí do vì sao nên tạo trang web local WordPress?
Trang web local WordPress là một cách phổ biến được sử dụng nhiều nhất giữa các deverloper và chủ sở hữu trang web. Cho phép bạn kiểm tra WordPress mà không cần phải tạo trang web thực sự trên internet.
Các trang web local chỉ hiển thị trên máy tính của bạn. Bạn có thể thử các theme và plugin WordPress khác nhau, kiểm tra các tính năng và tìm hiểu các kiến thức cơ bản về WordPress.
Nếu bạn đã có sẵn trang web WordPress rồi, bạn nên tạo sẵn một bản sao local của trang web đó để thử các bản cập nhật plugin mới trước khi triển khai chúng trên trang web chính của bạn.
Điều quan trọng là trang web local sẽ chỉ hiển thị trên máy tính của bạn. Nếu bạn muốn xây dựng một trang web WordPress chính thức, bạn cần một tên miền và hosting WordPress. Hãy làm theo các hướng dẫn từng bước trong blog WordPress để tạo trang web chính thức tại link này.
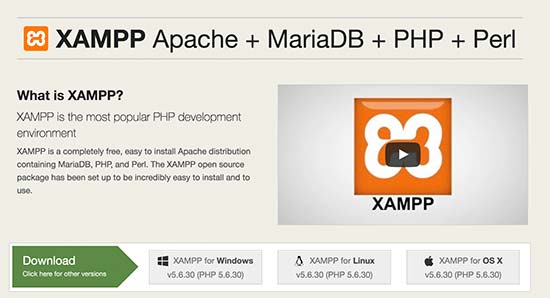
What is XAMPP?
In order to create a local WordPress site, you will need to set up a web server software (Apache), PHP, and MySQL on your computer.
PHP is a programming language and MySQL is a database management software. Both of them are required to run WordPress.
Installing each of these software separately is quite difficult for beginners. This is where XAMPP comes in.
XAMPP makes it easy for you to build WordPress websites locally. It is available for Windows, Mac, and Linux based computers.
Let’s get started.
XAMPP là gì?
Để tạo một trang web WordPress local, bạn cần thiết lập một phần mềm server web (Apache), PHP và MySQL trên máy tính của bạn.
Trong đó PHP là ngôn ngữ lập trình ; MySQL là phần mềm quản lý database. Cả hai bạn đều phải có để chạy WordPress.
Tuy nhiên việc cài đặt riêng PHP lẫn MySQL lại gây nhiều khó khăn cho người mới bắt đầu. Đó là lí do mà bạn cần đến XAMPP.
XAMPP giúp bạn dễ dàng xây dựng các trang web WordPress local hơn. Thêm nữa XAMPP còn có sẵn cho các máy tính chạy Windows, Mac và Linux.
Bắt đầu nào.
Installing XAMPP on Your Computer
First, you need to visit the XAMPP website and click on the download button for your operating system.

Depending on your operating system, your installation wizard and the application interface may differ from the screenshots here. For the sake of this article, we will show you the Windows version of the software.
After downloading XAMPP, you will need to click and run the installer.
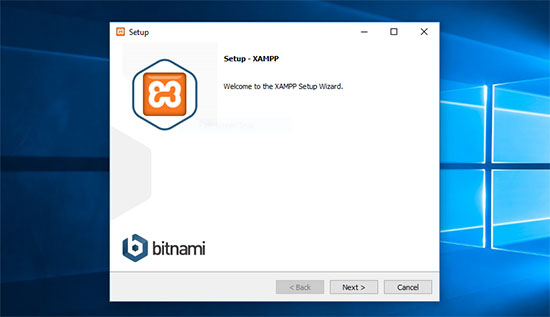

XAMPP will ask you where you want to install the software and which packages you’d like to install. The default settings will work for most users. Keep clicking on ‘Next’ to finish the setup wizard.
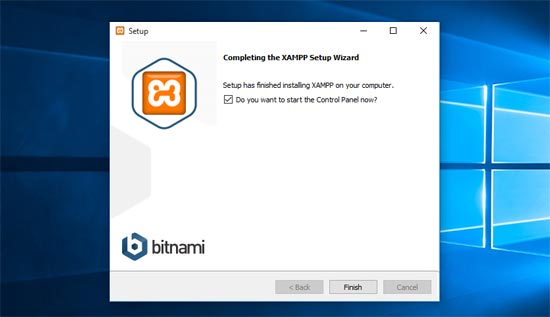
After finishing the wizard, check the ‘start the control panel now’ option and then click on the finish button.
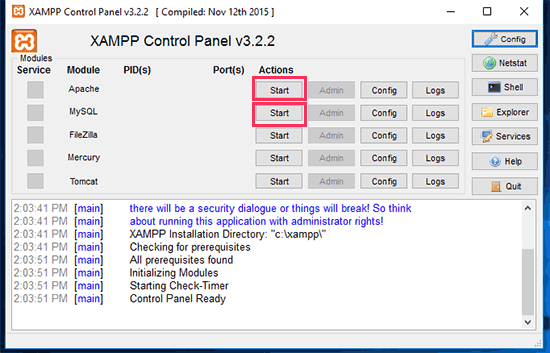
This will launch the XAMPP control panel. Go ahead and click on the start button next to Apache and MySQL.

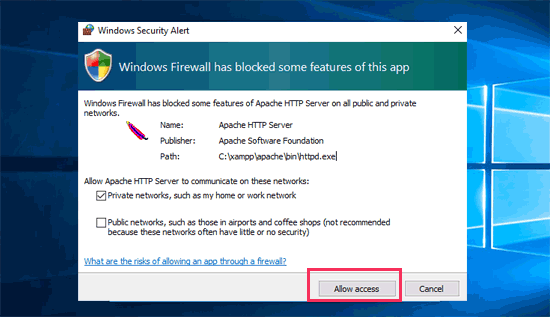
XAMPP will now start Apache and MySQL. You may see a Windows Firewall notification, it is important that you click on ‘Allow Access’ button for both applications to run on your computer.
Once both applications are started their names will be highlighted in Green.
You have successfully installed XAMPP on your computer.
Now you are ready to create a local website and install WordPress using XAMPP.
Creating a Local WordPress Site with XAMPP
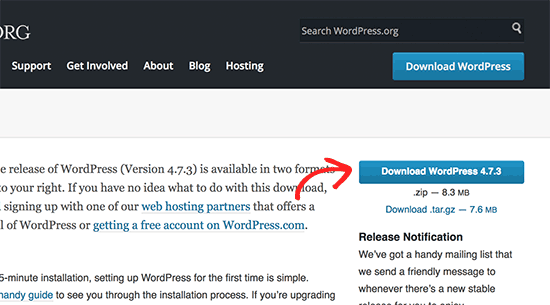
First, you will need to download WordPress. Visit the WordPress.org website and click on the ‘Download WordPress’ button.

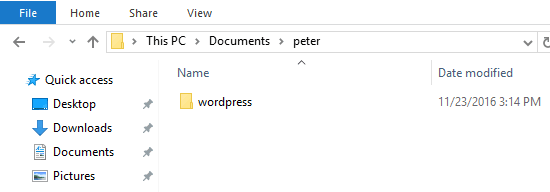
After downloading WordPress, you need to extract the zip file, and you will see a wordpress folder. You need to copy this folder.

Next, head over to your XAMPP installation folder.
On Windows it would be C:/Program Files/XAMPP/htdocs or C:\Xampp\htdocs folder.
On Mac, it will be /Applications/XAMPP/htdocs folder.
Paste the wordpress folder you copied earlier inside htdocs.
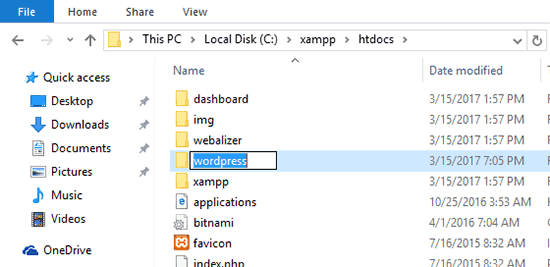

We recommend renaming the wordpress folder to website1. This will help you easily identify your local site.
Next, you need to open your favorite web browser and visit localhost/website1. You will see a page like this:
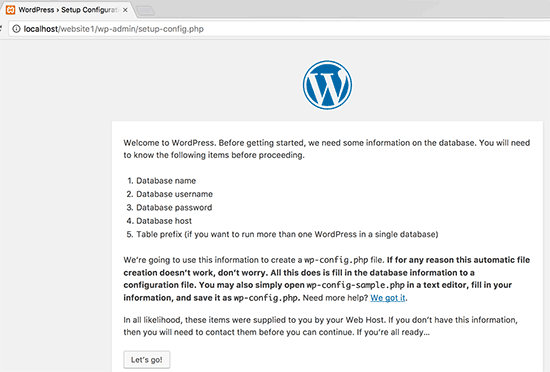

This page will tell you that WordPress needs a database name, database username, password, and host information.
Let’s create a database for your WordPress site.
You’ll need to open a new browser tab and visit localhost/phpmyadmin/. This will launch phpMyAdmin app that comes pre-installed with XAMPP. It allows you to easily manage your databases using a simpler interface.
You would need to click on Databases, provide a name for your new database, and then click on the create button to continue.
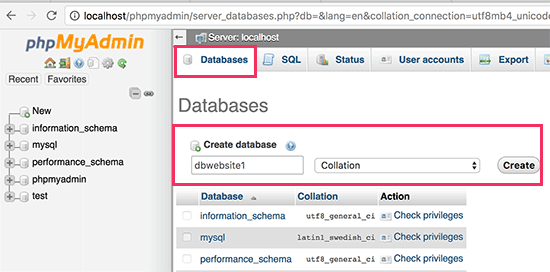

Now that you have created a database, you can use it for your WordPress site.
Switch back to /localhost/website1/ browser tab and click on the ‘Let’s Go’ button.
On the next screen, you will be asked to provide your WordPress database information.
Enter the database name you created earlier. Your username is ‘root’ and you should leave the password field blank. For the database host field, you need to use localhost.
See the screenshot below:
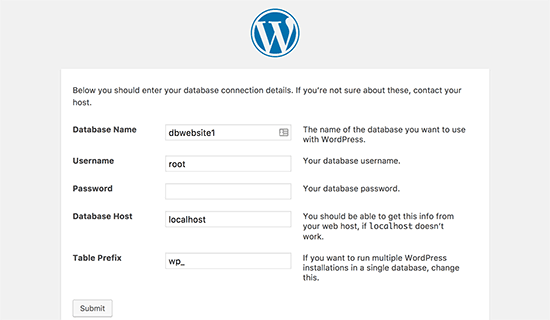

Once you are done, click on the ‘Submit’ button to continue.
If you are on Windows or Linux, WordPress will now store these settings in your WordPress configuration file called wp-config.php file.
However, if you are on Mac, then it will show you the contents of the file and will ask you to create it.
You will need to create this file in your website’s root folder.
After creating the file, paste the text you copied earlier inside it. Next, you need to save the file and return back to WordPress installer to continue.
In the next step, WordPress will ask you to provide information about your website. First, enter the title you want to use for this site.
After that you need to enter a username, password, and an email address for your admin account.
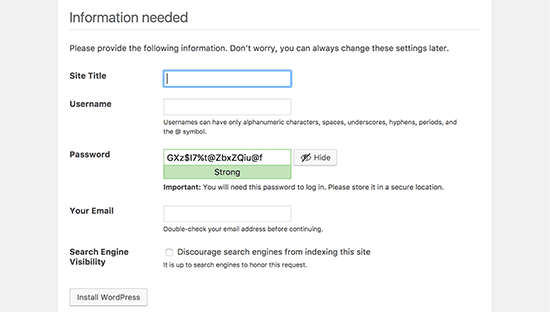

Once you have filled all the information, click on the ‘Install WordPress’ button to continue.
WordPress will now run the installation and prompt you to login once it’s done.
You can login to your website by going to /localhost/website1/wp-admin page and use the username / password that you entered during installation to login.


Things to Try After Creating a Local WordPress Site
Now that you have created your local WordPress site using XAMPP, you can work on it like you would do on a live WordPress site.
Head over to Appearance to customize your site’s appearance or install a new theme. Here are some great free themes that you can try.
The next thing you would want to try is WordPress plugins. Plugins are like apps for your WordPress site and allow you to add cool features like contact form, photo galleries, eCommerce store, etc.
Need help installing plugins? See our step by step guide on how to install a WordPress plugin.
After working on your local WordPress site you may want to move it to a live server. Head over to our step by step guide on how to move WordPress from local server to live site.
We hope this article helped you learn how to create a local WordPress site using XAMPP. You may also want to look at alternate ways to create local WordPress sites on Windows using Wampserver, and on Mac using MAMP.
If you liked this article, then please subscribe to our YouTube Channel for WordPress video tutorials. You can also find us on Twitter and Facebook.